
The Most Effective Way to Fix Bad Audio
If you have ever finished recording the perfect video to find the audio is missing, corrupt or noisy, you'll know just how frustrating it is.
Fortunately, there is a technique that can save a video that has missing or corrupt audio.
Using this technique, you can fix noisy videos and drastically improve the quality and tone of the dialogue. That technique is ADR, and it has been a staple of filmmakers for decades.
ADR Explained
ADR, which stands for Automated Dialogue Replacement, is the process of re-recording the dialogue of a video. Whenever the dialogue in a video has been recorded badly, ADR is the answer.
Around 10% of the dialogue that you hear in a modern film will be ADR. Quite often, the new dialogue will be recorded in a studio. For realism, ADR is sometimes recorded in the original environment where the video was recorded.
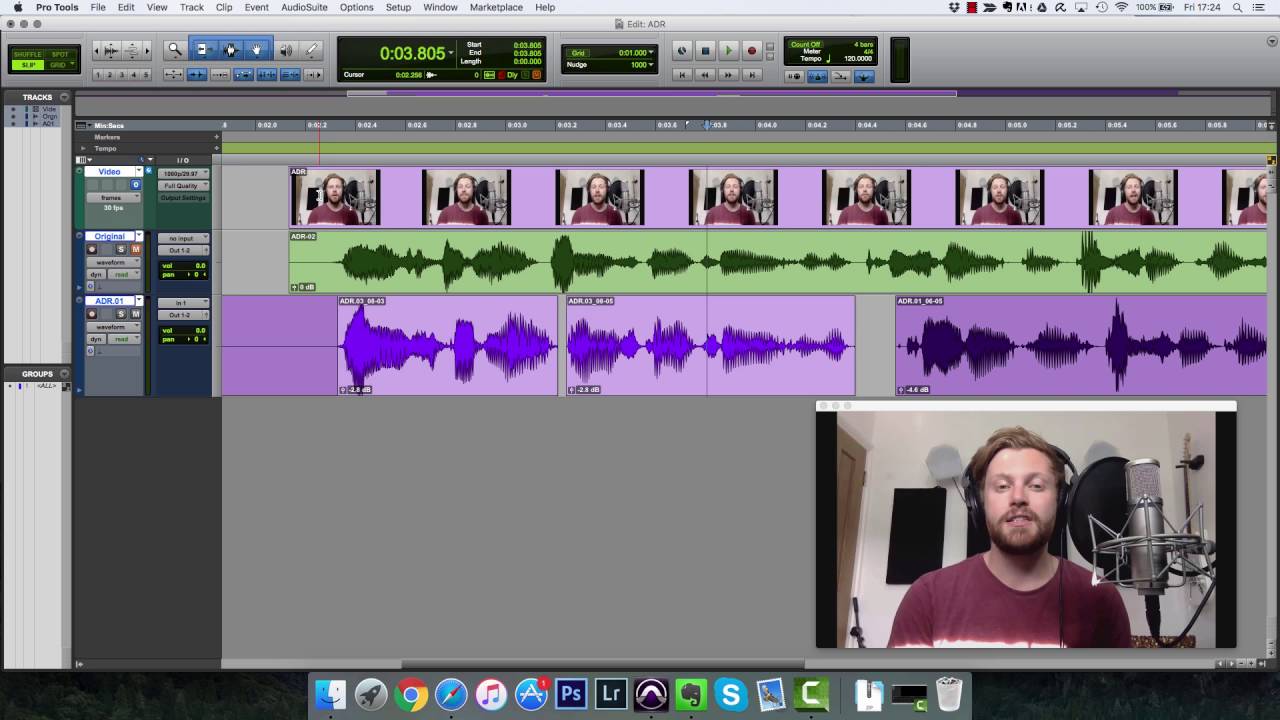
Despite its benefits, ADR is a time consuming process. First, the actor or speaker must ensure that they are lip-syncing perfectly with the video. This can sometimes take several minutes per line. After the recording has finished, the editing and mixing process starts.
The dialogue must be edited so that the lip-sync is unnoticeable. After that, the dialogue has to be mixed to sound consistent with the original audio. The mixer can make the difference barely audible using EQ, reverb, compression and many other tools.
In the next part of this tutorial, I'll give you a step-by-step outline of the ADR recording process.
How To Record ADR
Step 1
Import the video and audio into a DAW. Make sure the video is in a large window, so that yourself or the actor can easily see the the movement of the lips.


Step 2
If you're only replacing certain words or phrases, use markers to highlight the mistakes. If you are replacing the whole dialogue, skip this step.


Step 3
Loop the first section that you are re-recording and rehearse the dialogue.


Step 4
Record the new dialogue. I recommend you record several takes—three or more—for each phrase so that you have more to work with when editing. You have several options here.
Record to a new playlist or to a new take
Most DAWs have a built in take management system. In Pro Tools, you use playlists to record new takes. In Logic Pro and Reaper, you simply record over the top and the takes are automatically arranged for you.
Check how the DAW, that you use, works and what features it has for take management.
Punch in the recording
If you are only recording a single word or phrase, you could manually or automatically punch record.
Most modern DAWs have an automatic punch in feature, which I recommend you use in this case. The benefit of punching in is that the actor or yourself can get into the scene by talking along with the dialogue before recording the target word or phrase.
Loop record
If you are working with a difficult section, it might be quicker to use the loop record feature in your DAW. This will allow you to quickly record the same section multiple times. This is also the traditional way to record ADR, hence the automated part of the name.
How to Edit and Mix ADR
In this short video, I'll show you the process of editing and mixing ADR.
Conclusion
ADR is great for times when the audio in your video is unusable. Spend plenty of time on the recording phase getting the lip-sync perfect. This will make your job even easier when it comes to editing.
Finally, apply EQ and other plugins to make the ADR match the tone and character of the original audio.
 By
By


